• Skip to main content
  • Skip to footer

InRhythm

Your partners in accelerated digital transformation

  • Who We Are
  • Our Work
  • Practices & Products
  • Learning & Growth
  • Culture & Careers
  • Blog
  • Contact Us

Node

Jan 04 2023

Creating An Effective Proxy Using Node And Express

Overview

Engineers are often faced with the challenge of pulling together multi-website/application projects, without full cross-platform permissions. Utilizing both a Node and an Express proxy, can pull together two websites/applications in a formal and cohesive format.

The aforementioned situation comes up more often than one would think, whether it be a question of host permissions or compatibility, it can undoubtedly pull up a number of possible roadblocks. There are several reasons a developer might not be able to run a site or app in their local environment; perhaps it’s complex to set up or involves a number of permissions. Regardless of the reason, Node and Express can present a novel way to solve the problem.

No alt text provided for this image

In Matt Billard’s Lightning Talk session, we will be uncovering the the primary strategies for Creating An Effective Proxy Using Node And Express:

  • Overview
  • The Architecture
  • How It Works
  • “Gotchas” To Avoid
  • Live Demonstrations
  • Closing Thoughts

The Architecture

No alt text provided for this image

The browser makes a request to the Node Express proxy server where the following three scenarios crop up:

  1. If the user requested an HTML page, we need to combine the page from website 1 and 2. The proxy first asks website 1 and then website 2 for its HTML. It then modifies the two HTML files, combines them, and returns the result to the browser. (Details on how this works below.)
  2. The HTML page will then request the CSS, JavaScript, and other assets it requires. These requests will again go through the proxy which will pass on the requests. If website 1 has the asset, great, the proxy will return it to the browser. 
  3. If website 1 does not have the asset, the proxy will then ask website 2 and return it to the browser.

In the example below, when using the InRhythm.com website as the target into which an engineer can inject some local code (in this case a basic Create React App project); the final result is an actual screenshot of the 2 websites living together in the same browser window.

No alt text provided for this image

How It Works

As mentioned above, website 1 and 2’s HTML are combined. This involves a few steps. Webpages can’t have 2 doctype, html, head, or body tags, so the use of some regex to strip those, will be required. Now that website 2’s HTML is ready, a coder can inject it before website 1’s closing </body> tag. 

No alt text provided for this image

The above code shows the modifications to website 1’s HTML.

It shows a few things:

  1. Many websites have full ‘absolute URLs’ for their links. They look like this: https://www.inrhythm.com/who-we-are/. The problem is if the user clicks on this, they’ll be taken away from our proxy and go to the target website. One can solve this by removing all www.something.com pieces while retaining the language the after the slash.
  2. Injecting the CSS as discussed above, removes backgrounds and allows clicks to pass through website 2 to website 1. (Keep in mind this will probably be slightly different depending on the two sites a coder is combining.)
  3. Injecting the HTML from website 2 must be modified before closing the </body> tag.
No alt text provided for this image

“Gotchas” To Avoid

It can take a variety of trial and errors in order to develop a proxy to one’s exact specifications. Some of the most common occurrences, a coder may find themselves troubleshooting are:

  • Websites usually compress or “Gzip” their content. Normally this is a great thing. It means less data is transferred and websites load more quickly. However, when in need of a proxy, it can become quite troublesome for ease of use. An engineer can’t parse, manipulate, and modify HTML if it looks like gibberish. The solution is actually quite simple: as it turns out, there’s a header one can send with their request to ask the server not to Gzip anything.
No alt text provided for this image
  • When using a proxy, all requests are going to have the header “host” set to “localhost.” Now this is probably not a problem for most sites, but to the target server, this doesn’t look like a very normal request, and indeed, one will find some websites responded abnormally and will return pages that looked nothing like expected. The solution cab be found in modifying one of the headers of the request. 
No alt text provided for this image
  • Due to needing to modify requests quite a bit, this may result in some possible browser abnormalities. The solution to this problem is to delete the ‘content-length’ header before the proxy sends the browser any final response. This will stop the browser from truncating the response and removing all the hard work needed to customize one’s proxy. 
No alt text provided for this image
  • When combining sites that use https, the proxy might complain that the SSL certificates don’t match what it’s expecting. Turns out it’s rather easy to relax this with the following code: 
No alt text provided for this image

Live Demonstrations

Matt Billard has crafted an intuitive demonstration to help guide you through these principles in practicum: 

No alt text provided for this image

Be sure to follow Billard’s entire Lightning Talk to view this impressive demonstration in real time.

Closing Thoughts

The Node.js framework Express allows an engineer to create web servers and APIs with minimal setup. Using Express in a Node.js application to create an API Proxy to request data from another API and return it to a consumer, is a vital skill to add to one’s skills toolkit. Using Express middleware to help optimize the API Proxy, will allow a coder to raise the bar and improve performance for returning data from the underlying API.

To develop and learn from Billard’s signature “Code Collider” proxy, feel free to download the direct code from GitHub.

Happy coding!

To learn more about Creating An Effective Proxy Using Node And Express, along with some live test samples, and to experience Matt Billard’s full Lightning Talk session, watch here.
Written by Kaela Coppinger · Categorized: Cloud Engineering, InRhythmU, Product Development, Software Engineering · Tagged: Code Collider, Code lounge, express, INRHYTHMU, learning and growth, Node, Node.js, product development, proxy

Mar 26 2018

Debugging Node without restarting processes

This post is another by InRhythm’s own Carl Vitullo. For the full, original post check out “Debugging Node without restarting processes” on hackernoon. Make sure to follow him on Twitter and in Reactiflux!

I’m typically a frontend developer, but every now and then I find myself writing or maintaining some backend code. One of the most significant drawbacks I’ve encountered when switching contexts to Node is the lack of the Chrome Developer Tools. Not having them really highlights how hard I lean on them during my day to day in web development. Luckily, there are options for enabling them, and they’ve gotten much more stable and usable in recent times. Node has a built in debug mode that allows you to connect to the DevTools, and there’s a package called node-inspector that connects automatically.

It’s worth noting that versions of Node < 8 use a now-legacy Debugger API. Node 8 introduces the Inspector API, which better integrates with existing developer tools.

There’s one common theme that I’ve encountered when using these methods: they must be invoked when starting the node process. The other day, I found myself with a process in an odd state that I’ve had trouble reproducing, and I didn’t want to risk losing it by restarting the process to enable the inspector.

However, I found a solution — no less, a solution from the official Node docs.

A Node.js process started without inspect can also be instructed to start listening for debugging messages by signaling it with SIGUSR1 (on Linux and OS X).

This only applies to unix based OSes (sorry Windows users), but it saved my bacon in this case. The kill command in unix may be ominously named, but it can also be used to send arbitrary signals to a running process. man killtells me that I can do so using the syntax, kill -signal_name pid. The list of signal names can be enumerated with kill -l, shown below.

$ kill -l
hup int quit ill trap abrt emt fpe kill bus segv sys pipe alrm term urg
stop tstp cont chld ttin ttou io xcpu xfsz vtalrm prof winch info usr1 usr2

By default, kill sends an int, or an interrupt signal, which is equivalent to hitting ctrl-c in a terminal window. There’s a lot of depth to process signals that I won’t get into (I encourage you to explore them!), but towards the end of the list is usr1. This is the SIGUSR1 that the node docs are referring to, so now I just need a pid, or process ID, to send it to. I can find that by using ps and grep to narrow the list of all processing running on my system

$ ps | grep node
9670 ttys000 0:01.04 node /snip/.bin/concurrently npm run watch:server npm run watch:client
9673 ttys000 0:00.46 node /snip/.bin/concurrently npm run watch:server-files npm run watch:dist
9674 ttys000 0:33.02 node /snip/.bin/webpack — watch
9677 ttys000 0:00.36 node /snip/.bin/concurrently npm run build:snip — — watch
9678 ttys000 0:01.65 node /snip/.bin/nodemon — delay 2 — watch dist ./dist/src/server.js
9713 ttys000 0:01.00 /usr/local/bin/node ./dist/src/server.js
9736 ttys003 0:00.00 grep — color=auto node

My output is a little noisy due to a complex build toolchain that spawns many processes. But I see down towards the bottom the right process: node ./dist/src/server.js, with a pid of 9713.

Now I know the signal name is usr1 and the pid is 9713, so I need to run.

$ kill -usr1 9713

It runs with no output, but I check the logs of my node process and see

Debugger listening on ws://127.0.0.1:9229/ad014904-c9be-4288–82da-bdd47be8283b
For help see https://nodejs.org/en/docs/inspector

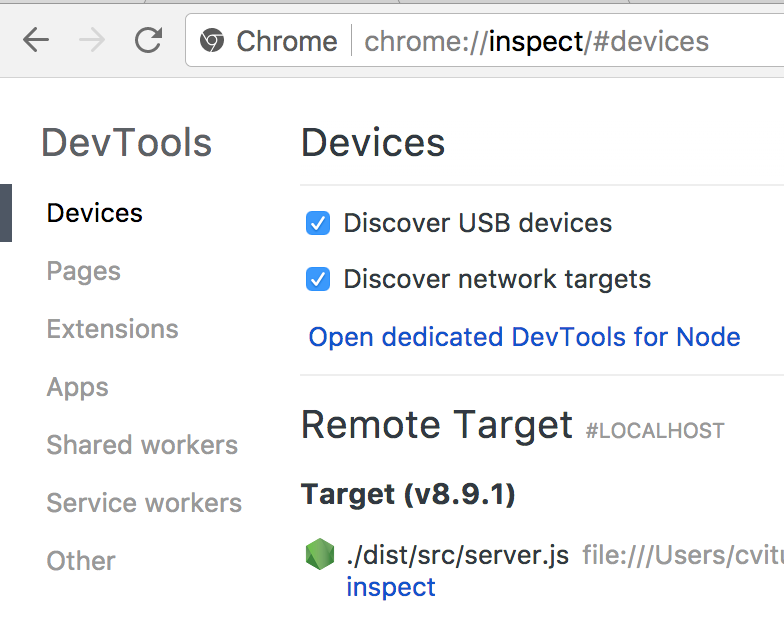
I can open chrome://inspect, and I immediately see my inspect target.

I click “inspect”, and I’m rewarded with a Chrome DevTools window in the context of my node process! I can use the profiler to audit performance, use the source tab to add break points and inspect the running code, and use the console to view logs or modify the variables in the current scope, just like I would on the web.

Written by Carl Vitullo · Categorized: InRhythm News, Learning and Development, Software Engineering · Tagged: best practices, Chrome, CLI, Devtools, Inspector, JavaScript, kill, Linux, Node, Processes, Signals

Apr 25 2017

Engineering Driven Culture – InRhythm’s Code Lounge


[huge_it_slider id=”3″]

Last week, driven by the feedback from our engineering leadership team, we held InRhythm U’s first-ever Code Lounge, inviting everyone from across the company and a few external guests to learn new skills, brush up on existing ones, or just get help on a personal project.

Code Lounge featured technical “stations” for Angular, React, React Native, Express, Vue, Node.js, Java, QA, UX and Product, each led by an InRhythm senior developer instructor. Accompanied by food and drinks on the company, the event provided an easy atmosphere and low-key way for everyone to network and learn a thing or two!

Here are a few key takeaways and learnings from Code Lounge:

  1. To understand what is important to our engineers, we need to be constantly listening to and engaging with our teams. While Vue and Java were not on our list of station offerings originally, in putting the event together we quickly found out that they are in high demand. Luckily, we were able to add both of these to our agenda, thanks to our very talented engineers who were able to lead these discussions.
  2. Collaboration happens when culture is driven from bottom up, not top down. Our engineers and UX/product leads single-handedly drove Code Lounge, with management simply enabling from the background with budget and logistics support. The magic of the night was the true collaboration seen across the stations, individuals coming prepared with best practices in their domains to share without being asked, and amazing learning and teaching happening in tandem across the room.
  3. Angular seemed to be the least popular station at the event, perhaps because a large part of our team is already fluent in Angular or perhaps due to newer technologies featured, such as Vue and React – these were the most popular and buzzed-about tables.
  4. We love learning and development at InRhythm, but admittedly beer on tap, Lombardi’s pizza, pool and music make it even better.

At InRhythm, our goal is to give our people the best opportunities for learning and growth. This goal is something I feel very passionate about as do all our senior leaders across the organization. Code Lounge is just one example of how we keep our company culture and ourselves at the top of our game!  If you want to find out more, visit us at www.inrhythm.com.


Written by Shivani York · Categorized: Bootcamp, Code Lounge, Events, Financial Services, InRhythm News, Learning and Development, Software Engineering, Talent · Tagged: Angular, Code lounge, engineers, Java, JavaScript, Learn, Node, Node.js, React, React native, software engineering

Footer

Interested in learning more?
Connect with Us
InRhythm

110 William St
Suite 2601
New York, NY 10038

1 800 683 7813
get@inrhythm.com

Copyright © 2023 · InRhythm on Genesis Framework · WordPress · Log in

This website uses cookies to improve your experience. We'll assume you're ok with this, but you can opt-out if you wish. Cookie settingsACCEPT
Privacy & Cookies Policy

Privacy Overview

This website uses cookies to improve your experience while you navigate through the website. Out of these cookies, the cookies that are categorized as necessary are stored on your browser as they are essential for the working of basic functionalities of the website. We also use third-party cookies that help us analyze and understand how you use this website. These cookies will be stored in your browser only with your consent. You also have the option to opt-out of these cookies. But opting out of some of these cookies may have an effect on your browsing experience.
Necessary
Always Enabled
Necessary cookies are absolutely essential for the website to function properly. This category only includes cookies that ensures basic functionalities and security features of the website. These cookies do not store any personal information.
Non-necessary
Any cookies that may not be particularly necessary for the website to function and is used specifically to collect user personal data via analytics, ads, other embedded contents are termed as non-necessary cookies. It is mandatory to procure user consent prior to running these cookies on your website.
SAVE & ACCEPT