Based on a Lightning Talk by: James Putman, Senior DevOps Engineer @ InRhythm on March 29th, 2023 as part of the Propel Spring Quarterly Summit 2023
Author: Mike Adams, Senior Technical Writer @ InRhythm
Infrastructure as Code (IaC)

IaC provides many benefits. It brings the concepts of application development to infrastructure provisioning and allows the provisioning to occur much earlier in the lifecycle as part of application development.
IaC entails source-code management, version control, code-reviews, and collaboration with pull-requests. It allows you to simultaneously maintain multiple cloud providers using hybrid cloud setups to access different services across the major competitors.
With IaC you can provision or destroy your entire infrastructure architecture in one action, allowing different environments to seamlessly represent your architecture.
Other benefits include the ability to modularize infrastructure, thereby increasing its portability and flexibility. Another benefit of IaC is that it allows you to fully automate and easily configure the infrastructure using CI/CD pipelines as that is a part of source code control management.
Introduction To Pulumi

Pulumi is a language agnostic IaC tool used to manage project infrastructure. It provides provisioning of cloud resources and uses a “general purpose language” (GPL), such as JavaScript, GO, Python, etc. to define pipelines in the tool. It integrates easily with GitHub, Azure, AWS, etc., and is an open source package. Pulumi manages the resources.
When compared against Terraform (a similar package of longer standing), Pulumi supports a wider range of conditional options and has more robust utility functions and types. It is easier for developers to use and can integrate with Terraform providers. It supports testing frameworks and Unit, Property, and Integration testing. Unlike Terraform, Pulumi uses the General Purpose Language to describe workflows, while Terraform uses the Hashicorp Configuration Language (HCL).
Because Pulumi is newer than Terraform, as expected the community is smaller and it has less mature documentation. Unrelated to maturity, however, Pulumi provides its state management features behind a paywall. You can, however, manage the state locally or in AWS using an S3 bucket.
Pulumi Projects
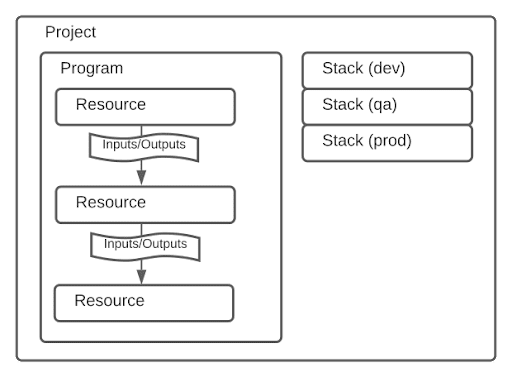
For our post, the Pulumi Project is the GitHub account that contains the Program, which is the code or repo in that account. The Stacks equate to the branches or environments in the repo and represent different deployment states.
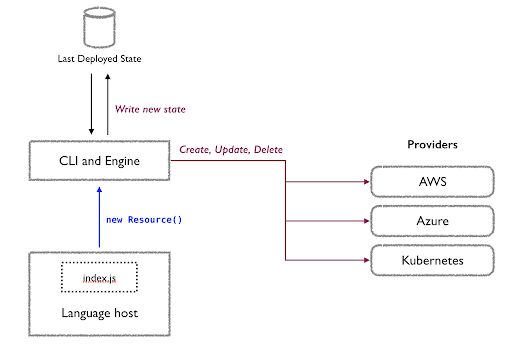
The Program contains the Language Host (part of the Program), which is composed of Resources, the Language Executor, and the Language Runtime. The Resources themselves are binary plugins.
The Language Executor is responsible for launching the Language Runtime, which is in-turn responsible for detecting any Resource registrations changes (i.e., new, removed, updated) and then notifying the Deployment Engine of those changes. The Resources themselves are binary plugins that communicate with the various Providers. Pulumi Resources are stored in ~/.pulumi/plugins.
The Deployment Engine (part of the Pulumi CLI) reads the Notification and verifies that the current Resource States match those listed in the Notification. If the Deployment Engine detects differences, (i.e., a new, modified, or removed Resource), it notifies the Providers which then implement the desired Resource State(s).
The Pulumi SDK provides resource bindings.
Common Commands
Some common commands for working with Pulumi environments are pulumi up to deploy code and resource changes; pulumi stack to manage instances of the project; pulumi config to alter the stack’s config or secrets; and pulumi destroy, to completely tear down the stack’s resources.

Operating Details

This is a python-based demo using a virtual environment. If you have the AWS CLI installed and configured, Pulumi will respect its configuration.
Prerequisites
- Pulumi CLI
- Python (v3.7+)
- An AWS account (i.e., for development, you should also have the AWS CLI installed to simplify your activities)
- A static website in your IDE to use with Amazon’s S3 website support
Pulumi Setup
Install the Pulumi CLI. Note that you’ll need your Pulumi access token or you must login to the Pulumi website during the setup.
- Create a directory location for your project.
- CD to that location
- Open a terminal in that location and run the following command to create and initialize the Pulumi stack:
pulumi new
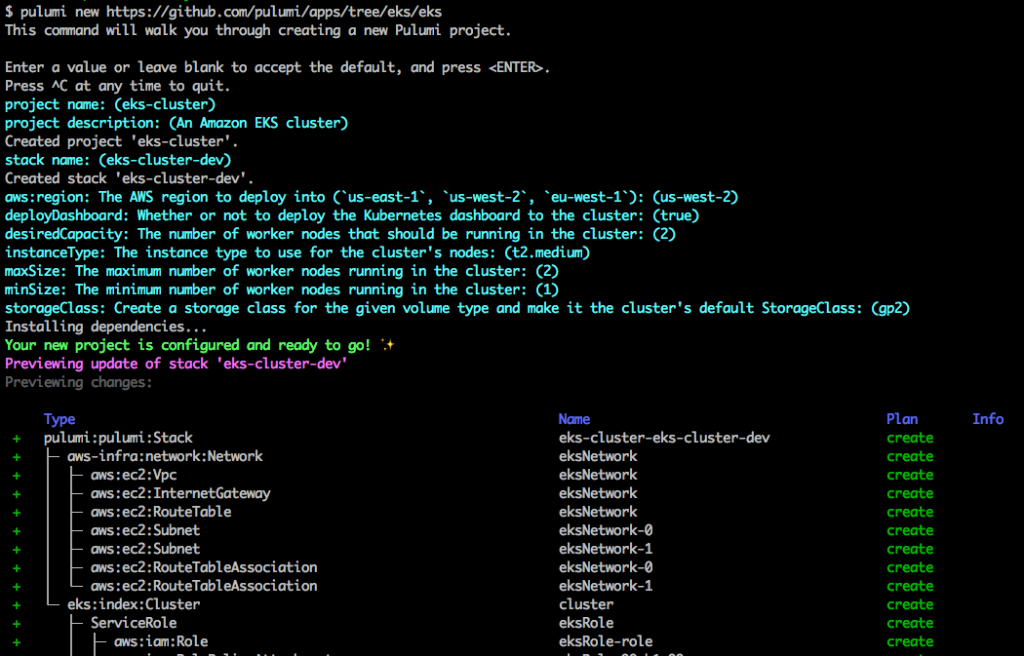
Pulumi displays the available cloud/language templates for project scaffolds and offers numerous cloud and language combinations (206 combinations as of 07 Apr 2023). This post uses aws-python.
Pulumi prompts for the project name (the PWD is the default project name), project description, stack name, and cloud region. If you need to create a new stack for this project, simply provide the stack name in “org-name/stack-name” format. If you do not provide the organization name for a new stack, Pulumi associates the stack with the current user. Finally, Pulumi prompts for the cloud region. At this point, Pulumi creates a virtual environment, updates that environment’s toolset, and then downloads and installs the dependencies.
On completion, Pulumi displays, “Your new project is ready to go.”
Pulumi also added the following scaffolding files to your project location:
Pulumi.dev.yaml– contains the configuration for the stack you’re initializingPulumi.yaml– Defines the project__main.py__– contains a program stub with the Pulumi imports and defines the program’s resources.__main__.pycreates a new S3 bucket and exports the bucket namerequirements.txt– contains the Pulumi version requirementsvenvdirectory – This directory contains the Pulumi scripts, packages, libraries, and a Python runtime. venv is also a Python virtual environment
Note that the files and their names may vary according to your choice of ‘cloud-language’ combination.

If the AWS CLI is not available, please install it at this time. During the AWS configure step, you will need your AWS Access Key ID and AWS Secret Access Key. You must also know the Output format (if any) and the AWS Region.
At this point, run pulumi up to perform the initial update.
Selecting Yes causes Pulumi to update the modified resource on the AWS site. Pulumi displays the Outputs, the bucket, bucket_name, and website_url, lists a count of the changed and unchanged resources, and the duration of the update.
Pulumi displays sparse details on the proposed update and prompts for confirmation before taking any action. Select details to view a verbose explanation or press CTRL+O (Mac: CMD+O) to open your default web browser to the changes page at the URL shown on the View in Browser (Ctrl+O) line (Mac shows CMD+O instead). Select yes to perform the update or no to abandon the update.
The Outputs reflect the information from your AWS configuration.bucket : "my-bucket-92bcd61"
bucket_name: "s3-workshop-bucket-0146792"
website_url: "s3-workshop-bucket-0146792.s3-website-us-east-1.amazonaws.com"
The __main.py__ file must import json, mimetypes, and os from Python; import FileAsset, Output, and export from pulumi; and import s3 from pulumi_aws. Additionally, you must define the content_dir to the static website in your project (“www” in the demo) and configure the bucket policy for the static site.
Ensure that you add the appropriate Pulumi libraries to your IDE’s project.
Code
Pulumi-generated __main.py__
This is the file as generated by pulumi new:
"""An AWS Python Pulumi program"""

import pulumi
from pulumi_aws import s3

# Create an AWS resource (S3 Bucket)
bucket = s3.Bucket('my-bucket')

# Export the name of the bucket
pulumi.export('bucket_name', bucket.id)
__main.py__ Modified for the Demo
This is the file modified to add buckets, policies, and a static website.
"""An AWS Python Pulumi program"""

# Setup the imports
import json
import mimetypes
import os
import pulumi
from pulumi import FileAsset, Output, export
from pulumi_aws import s3

# Create an AWS resource (S3 Bucket)
bucket_name = s3.Bucket('my-bucket')

# Export the name of the bucket
pulumi.export('bucket', bucket_name.id)

web_bucket = s3.Bucket('s3-workshop-bucket',
    website=s3.BucketWebsiteArgs(
        index_document="index.html",
    ))

# Set the content directory for the website
content_dir = "www"
for file in os.listdir(content_dir):
    filepath = os.path.join(content_dir, file)
    mime_type, _ = mimetypes.guess_type(filepath)
    obj = s3.BucketObject(file,
        bucket=web_bucket.id,
        source=FileAsset(filepath),
        content_type=mime_type)

# Define AWS buckets
def public_read_policy_for_bucket(bucket_name):
    return Output.json_dumps({
        "Version": "2012-10-17",
        "Statement": [{
            "Effect": "Allow",
            "Principal": "*",
            "Action": [
                "s3:GetObject"
            ],
            "Resource": [
                Output.format("arn:aws:s3:::{0}/*", bucket_name),
            ]
        }]
    })

bucket_name = web_bucket.id
bucket_policy = s3.BucketPolicy("bucket-policy",
    bucket=bucket_name,
    policy=public_read_policy_for_bucket(bucket_name))

# Export the name of the bucket
export('bucket_name', web_bucket.id)
export('website_url', web_bucket.website_endpoint)
Static Website Files
There are no special changes or requirements for the website relating to Pulumi. Pulumi updates website components during the pulumi up process when the user selects, yes to the update confirmation.
Resources
- Pulumi
- Pulumi: https://www.pulumi.com/
- Pulumi blog: https://www.pulumi.com/blog/
- Pulumi Slack: https://slack.pulumi.com/
- Documentation
- Pulumi Documentation (Main): https://www.pulumi.com/docs/
- Pulumi Getting Started: https://www.pulumi.com/docs/get-started/
- Pulumi CLI Reference: https://www.pulumi.com/docs/reference/cli/
- Community
- Pulumi Community: https://www.pulumi.com/community/
- Best Practices
- Pulumi best practices: https://www.pulumi.com/blog/pulumi-recommended-patterns-the-basics/
- Repositories
- InRhythm Pulumi with Python Repo: https://github.com/inrhythm-workshops/pulumi-with-python
- Pulumi Github Repo: https://github.com/pulumi/
