Based on a Lightning Talk by: Garik Hovhannisyan, Cloud Engineering Lead @ InRhythm on November 9th, 2023
Overview
In the dynamic landscape of modern software development, ensuring the resilience and reliability of applications is paramount. Chaos engineering, a discipline that simulates real-world failures to uncover vulnerabilities proactively, has gained prominence.
This article delves into Chaos Monkey for Spring Boot, a tool designed to inject controlled chaos into a system to fortify it against unforeseen failures:
- Overview
- What Is Chaos Monkey?
- Why Chaos Monkey For Spring Boot?
- Getting Started
- Configuring Chaos Monkey
- Chaos Experiments
- Real-World Benefits
- Closing Thoughts
What Is Chaos Monkey?
Chaos Monkey is an open-source tool developed by Netflix to test the reliability of their systems. The idea is simple but powerful: intentionally inject failures into a production environment to uncover weaknesses before they impact users.
Why Chaos Monkey For Spring Boot?
Spring Boot, with its emphasis on simplicity and convention over configuration, has become a popular framework for building robust microservices. Chaos Monkey for Spring Boot is tailored for applications built on this framework, offering specific features for injecting chaos effectively.
Getting Started
To integrate Chaos Monkey into a Spring Boot application, start by including the Chaos Monkey starter in your project. This will provide the necessary dependencies and configurations for Chaos Monkey.

Configuring Chaos Monkey
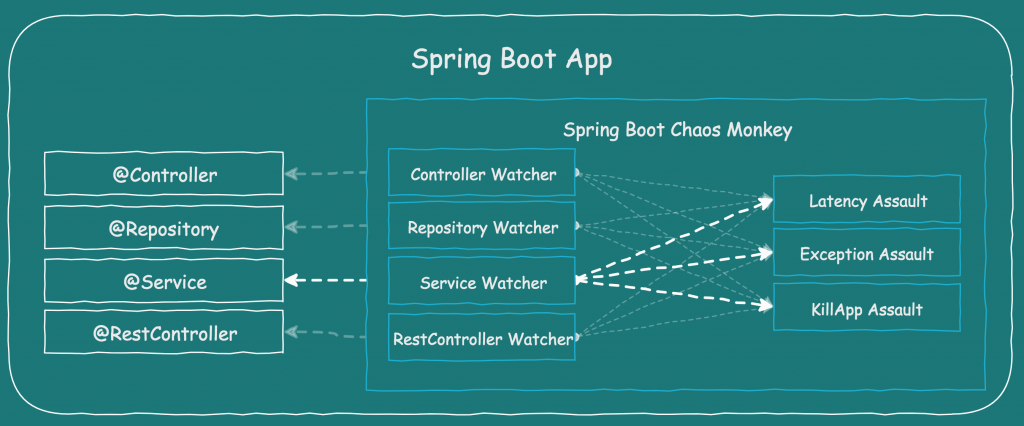
Chaos Monkey can be configured to target specific parts of your system. For instance, you might want to focus chaos experiments on a particular microservice or database. Configuration is done in the ‘application.properties’ or ‘application.yml’ file.

In this example, Chaos Monkey is configured to operate at level 2, introducing latencies between 1000 and 3000 milliseconds. It is also set to actively throw exceptions and kill the application.
Chaos Experiments
Chaos Monkey operates through a series of “assaults” or experiments. These experiments can simulate latency, exceptions, and even terminate instances. By running these experiments in a controlled environment, teams can identify weaknesses and improve the system’s overall resilience.
Real-World Benefits

Implementing Chaos Monkey for Spring Boot offers several real-world benefits:
- Proactive Issue Identification
Chaos Monkey helps identify potential issues in a controlled environment, allowing teams to fix them before they impact users.
- Improved Resilience
By continuously testing the system’s response to failures, Chaos Monkey contributes to building a more resilient and fault-tolerant architecture.
- Confidence In Production Readiness
Successfully withstanding chaos experiments provides confidence that the application is production-ready and can handle unexpected challenges.
Closing Thoughts

Chaos Monkey for Spring Boot is a valuable tool for teams seeking to enhance the reliability and robustness of their applications. By intentionally injecting controlled chaos, development teams can identify and address potential weaknesses, fostering a culture of resilience and continuous improvement. Incorporating Chaos Monkey into your Spring Boot projects aligns with the principles of chaos engineering, making your systems more robust in the face of real-world challenges.