• Skip to main content
  • Skip to footer

InRhythm

Your partners in accelerated digital transformation

  • Who We Are
  • Our Work
  • Our Culture
  • Events
  • Testimonials
  • Blog
  • Contact Us

Google Developers

Apr 23 2019

Adventures in Chrome Extension Building

A couple of weeks ago I created my first Chrome extension. It was a great learning exercise, and if you’ve ever been curious about making your own, the basics I cover here will be helpful in your own journey if you choose to jump into the wide world of extension development. Here, I want to document my journey including the steps (and missteps) I took along the way.

Why Chrome Extensions?

I’ve always been a fan of Chrome extensions, yet somehow had never made one myself, despite having plenty of “what if” moments imagining how websites I frequently use could be made (even slightly) better. I finally made the decision to act with a site that happened to be the Firebase developer console’s hosting tab. This tab displays the DNS records one must add to the registrar from which the domain was purchased. There are two IP Address values one must copy over, and after a while I thought: “what if this copy paste could be automated?” The end result now lives on the Chrome Webstore.

Namecheap is a registrar which provides services on domain name registration. A couple years ago they added two-factor authentication as an option for additional account security. 2FA is great, but it makes logging into your dashboard more of an effort.

Luckily, Google has made plenty of documentation and guides available covering all things Chrome extension-related, and they can be found here. There are also countless articles on Medium, and other blogs serving as great complementary reading; I found seeing the same info described from different perspectives gives a fuller picture.

Initial Development + Dealing with Errors

The process started with doing a whole lot of copying and pasting, making sure the manifest.json file had everything it needs to contain. My first real roadblock had to do with figuring out how to dynamically add a button to the existing webpage. The particular challenge was that the modal I wanted that button to display inside of did not exist in the DOM on page load. Furthermore, the ID assigned to that modal appeared to be random due to it being different upon page every refresh:

Browser development window highlighting md-dialog#dialogContent ID modal

That led me to try a different approach, utilizing the popup window that appears after clicking on the Chrome extension’s icon in the upper right-hand corner of the browser as the way of connecting the Firebase console to Namecheap’s API.

Switching from plain JS to React

There came a point where I realized there was too much conditional logic affecting the content of the popup. For example, I needed to take into account whether:

1. The user has the Namecheap API credentials already saved to the extension’s local storage.
2. The user is currently on the Firebase console hosting tab’s URL
3. The user has the “Connect domain” modal open
4. A request is being made with the user’s Namecheap API credentials
5. The extention successfully retrieved those credentials from the API call

All of this quickly became messy, so switching to React appeared to be a reasonable option. This guide gives a great starting point for doing so with create-react-app. The resulting App.js file contains the conditionals for driving the five scenarios mentioned above.

When the component first mounts, three asynchronous actions take place for 1) getting the user’s IP address, 2) getting the locally saved data, and 3) getting the URL of the current tab. The values retrieved determine what next appears in the popup window.

Namecheap API

Namecheap offers an API that lets users do most things they can do on the web dashboard. The only two methods I needed to use were getHosts and setHosts. These, along with all other API methods, require certain request parameters to exist such as ApiUser and ApiKey. Responses come back in XML format, which I had never dealt with in JavaScript before. This was not a major roadblock but led to a healthy dose of trial and error while attempting to access any response errors. Using something like this:

const errors = xmlDoc.getElementsByTagName('Error') || [];

was sufficient because that Errortag will only appear when there is at least one.

One thing I had to watch out for in using the setHostsmethod was making sure I didn’t accidentally delete existing DNS Host records, or at least not accidentally. I say accidentally because, as per the API docs:

“All host records that are not included into the API call will be deleted, so add them in addition to new host records.”

The only time I can see it being beneficial to delete records is to get rid of the two that exist by default after registering a new domain, one which is of type CNAME Recordwith value http://parkingpage.namecheap.com., and the other being a URL Redirect Record, since you would have to remove those eventually in order to see actual content on the site.

Publishing to the Chrome Webstore

Compared to the process of developing this application, actually publishing it to the Chrome Webstore was surprisingly easy. The steps are succinctly described here. A few screenshots, along with a one-time $5 registration fee, are the main necessities. After filling out other info (like the category this extension belongs to, whether you want to restrict its access in certain countries), and uploading a .zip file of the extension, it becomes accessible for anyone to download.

Next Steps

The Chrome extension I made was mostly for educational purposes, and without a doubt has at least a bug (or three). However, it’s helped pave a path toward making other extensions which have less niche use cases, such as one that adds custom “copy-to-clipboard” buttons with dynamically changing keyboard shortcuts to the page for every code snippet in a readme file on Github. Having already gone through the process and demystified the steps involved from inception to publishing, I feel more confident bringing my next “what if” idea to life. I hope this overview will help you do the same.

Written by Pat Needham · Categorized: InRhythm News · Tagged: Chrome, chrome extension, google chrome, Google Developers

Sep 24 2018

Lighthouse: The Coolest Tool You’re Not Using

This post was written by William Bratches, Lead, Senior Software Engineer at InRhythm.

Performance. Accessibility. Offline capability. Search engine optimization (SEO). These are advanced concepts whose analysis has been traditionally dependent on the grizzled experience of a team’s most senior engineers.

Except now there’s a tool to do it automatically.

Enter Lighthouse. It’s an open-source project from Google to assess webpage quality that will have a tremendous impact on your workflow. Available via Chrome, the CLI (Command-Line Interface), or npm, it can even be inserted into an existing automated testing suite. And it’s just dang cool.

Lighthouse in Action

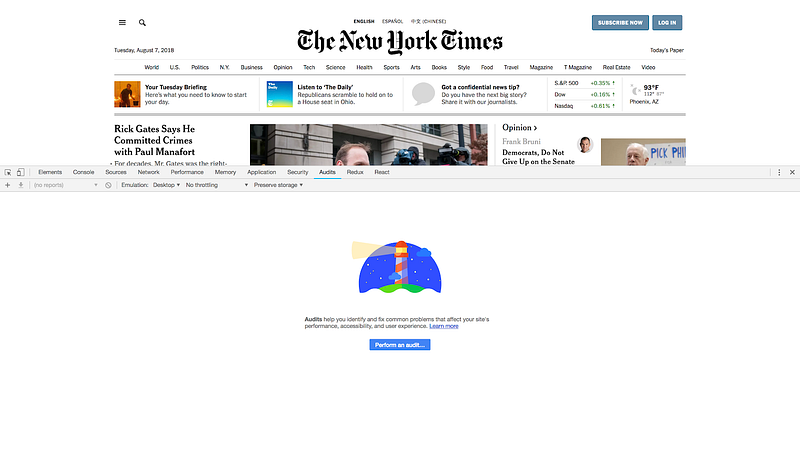
Using Chrome? You can use Lighthouse to analyze this very page. Open up the developer console with command + shift + c. You can also right click and select Inspect to open the Chrome console. and navigate to the Audits tab; you’ll be greeted with Lighthouse logo:

Note the ability to simulate a device to perform at the top of the console. Click the shiny blue “Perform an audit…” button, then leave all options selected. Click Run audit. It’s that easy — just wait a minute or two for the audit to complete.

Right away, Lighthouse shows us some important facts to remind us whywe’re doing a performance audit. Many of these facts are eye-opening:

  • 19 seconds is the average time a mobile web page takes to load on a 3G connection (yikes)
  • 75% of global mobile users in 2016 were on 2G or 3G.
  • The average user device costs less than 200 USD
  • The BBC has seen a loss of 10% of their users for every extra second of page load.
  • Walmart saw a 1% increase in revenue for every 100ms improvement in page load.

Remember these the next time a designer wants you to put a 4k wallpaper above the fold.

Making Sense of Lighthouse

Lighthouse will give you a categorical breakdown of its findings. Let’s check out what some of then look like.

Lighthouse will analyze our site for Performance, SEO, Accessibility, Progressive Web App, and Best Practices. A detailed breakdown of these categories can be found in the documentation — for now, we’ll just look at performance.

For each category, Lighthouse will break down bottlenecks and milestones for a site. Here, it flags long load time for the New York Times website. Great, you might say — but there’s been a gazillion performance/accessibility/SEO tools since forever. What makes Lighthouse different?

Lighthouse actually shows how to improve these metrics! In the “Opportunities” section, specific problems are pinpointed. This makes it easy to know what the next steps are for improving optimization.

Continuous Integration (CI)

Want a build to fail if it doesn’t meet accessibility requirements? Want to point the finger at Bob because he removed code minification and doubled the page load time?

That’s right. Lighthouse is incredibly versatile and is available outside the context of Chrome. It’s available as an npm package and can thus be integrated programmatically in a CI pipeline — or anywhere, really.

If you’re using Travis CI, there’s an open-source project to making CI integration easy as pie. You can drop it in the `package.json` and then execute it in Travis:

“scripts”: {
“lh”: “lighthouse-ci”
}

install:
— npm install # make sure to install the deps when Travis runs.
after_success:
— ./deploy.sh # TODO(you): deploy the PR changes to your staging server.
— npm run lh — https://staging.example.com

As Lighthouse’s popularity spreads, we hope to see more integrations in the future. Given its availability in NodeJS, there’s nothing stopping an engineer from undertaking integrations with other popular CI frameworks.

This was a quick introduction, but I highly recommend you try the tool for yourself and gain new insights into popular sites you visit. The comprehensiveness of the reports is impressive, and is bound to teach anyone a thing or two.

Written by William Bratches · Categorized: DevOps, InRhythm News, Learning and Development · Tagged: Google Developers

Footer

Interested in learning more?
Connect with Us
InRhythm

140 Broadway
Suite 2270
New York, NY 10005

1 800 683 7813
get@inrhythm.com

Copyright © 2021 · InRhythm on Genesis Framework · WordPress · Log in

This website uses cookies to improve your experience. We'll assume you're ok with this, but you can opt-out if you wish. Cookie settingsACCEPT
Privacy & Cookies Policy

Privacy Overview

This website uses cookies to improve your experience while you navigate through the website. Out of these cookies, the cookies that are categorized as necessary are stored on your browser as they are essential for the working of basic functionalities of the website. We also use third-party cookies that help us analyze and understand how you use this website. These cookies will be stored in your browser only with your consent. You also have the option to opt-out of these cookies. But opting out of some of these cookies may have an effect on your browsing experience.

Necessary Always Enabled

Necessary cookies are absolutely essential for the website to function properly. This category only includes cookies that ensures basic functionalities and security features of the website. These cookies do not store any personal information.

Non-necessary

Any cookies that may not be particularly necessary for the website to function and is used specifically to collect user personal data via analytics, ads, other embedded contents are termed as non-necessary cookies. It is mandatory to procure user consent prior to running these cookies on your website.