• Skip to main content
  • Skip to footer

InRhythm

Your partners in accelerated digital transformation

  • Who We Are
  • Our Work
  • Practices & Products
  • Learning & Growth
  • Culture & Careers
  • Blog
  • Contact Us

Propel Spring Quarterly Summit 2023

Apr 12 2023

Structured Concurrency In Swift

Based on a Lightning Talk by: Joshua Buchanan, Lead iOS Engineer @ InRhythm on March 28th, 2023 as part of the Propel Spring Quarterly Summit 2023

Author: Mike Adams, Senior Technical Writer @ InRhythm

Swift Concurrency

Design Credit: Joel Colletti, Lead UI/UX Designer @ InRhythm

Concurrency is a task-based system that allows developers to take full advantage of the “await” portion of the Async/Await keywords to perform concurrent task execution. An Async/Await task waits until its process finishes before continuing.

Async/Await lets you take advantage of parallelization to make full use of all the available CPU cores to give your users the best user experience. 

Swift Concurrency includes, Async/Await, Tasks, and Task Groups. As you read “Async/Await,” assume that it means the entirety of Swift Concurrency and not simply, Async/Await.

Here are the keywords and concepts we’ll use in discussing Structured Concurrency:

  • Task – That portion of the concurrency framework that creates the concurrent environment. It can throw errors and return values
  • Child Task – A task generated and managed by a Parent Task.The Parent is responsible for task execution
  • Cancellation – In Swift, you can cancel or stop any task from completing. Unlike Combine, structured concurrency does not require a strong reference to emit values from the publisher (i.e., the Task) and continue to run even if you remove references to the publisher. If you don’t want the task to run, you must either cancel or stop it
  • Priorities – Structured Concurrency’s Task Priorities are very similar to Apple’s Quality of Service system. Task Priorities include:
    • High
    • Background
    • Low
    • Medium
    • userInitiated
    • Utility

When using Structured Concurrency in your code, remember that while priority setting in your code tells the system which tasks are most important, those priorities are only a suggestion, not a mandate. 

Async/Await

Async/Await provides the Structured Concurrency that removes the necessity of manually propagating errors and managing cancellation, as well as any other types of concurrency issues (e.g., race conditions). It makes program logic simpler to follow as the methods execute linearly rather than with the back and forth required when using completion handlers. 

Structured concurrency also improves performance and allows for cleaner, more readable code with more precise error handling. In structured concurrency, long-running tasks are self-managing in regard to resources, error propagation, or any concurrency issues. 

Async/Await was first popularized in 2012 via the C# programming language. Between 2012 and 2020, other languages began adopting Async/Await, including but not limited to:

  • Python / Typescript in 2015
  • Kotlin in 2018
  • Rust in 2019
  • C++ in 2020
  • Swift in 2021

Tasks

Although Tasks appear very basic, behind the scenes there is a great deal happening. 

The Task keyword tells the compiler that the code inside the brackets must run in its own area using different rules than the rest of the application. This is the beginning of writing concurrent code in Swift.

In Swift, Tasks check if they were cancelled at appropriate times during execution. If cancelled, the Task begins whatever processing is necessary to cease execution and then responds to the cancellation. Depending on the code, the response could be returning partially finished work, returning an empty collection (or nil), or throwing a cancellation error.

Task Example

The load function shown below displays all the parts of a concurrent function coded as a task.

Child Tasks

Child Tasks are bound to a Parent Task and inherit the Parent Task’s Priority. Parent Tasks can have multiple Child Tasks and a Child Task can be a Parent Task to other Child Tasks.

While Parent Tasks can cancel a Child Task, a Child Task can not cancel their Parent task. Child Tasks begin whatever process is necessary for them to halt once their Parent Task is cancelled. All Child Tasks must finish before the Parent Task can be completed.

Cancellations

Unlike Combine, Tasks in Structure Concurrency will continue to run even when there are no Subscribers. Tasks run until they are completed or until you cancel them in code or programmatically. Cancellations are not determined by strong reference.

Tasks “know” whether they’ve been canceled and you can explicitly cancel a Task. You can also use the Task.checkCancellation() call to check if a Task was cancelled.

There are a number ways to programmatically cancel a Task including:

  • Navigating away from a view where the task was triggered
  • Canceling that Task’s Parent Task to cancel all of its Child Tasks
  • When another Child Task of the same Parent throws an Error
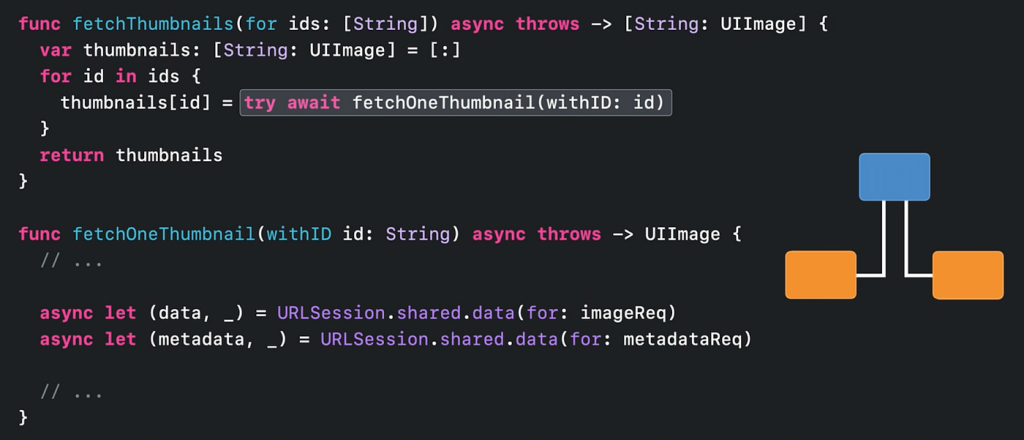
Async Let

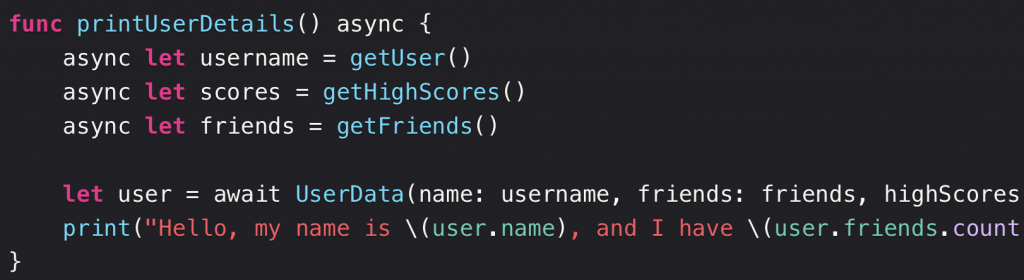
Async Let is a variation of Async/Await that differs from the Await version, in that it will immediately launch a known number of Tasks in parallel and manage them in a slightly different manner than Async/Await. Where an Async/Await call suspends the Parent Task during Child Task execution, the Async Let call allows the Parent Task to continue running normally. 

You would use Async Let when you’re certain that the Async code can run independently. Note that unlike a regular Async/Await Call, you cannot directly cancel Async Let calls.

A further difference is that you can only use Async Let in local declarations, not at the top level.

Use Async Let when you need the results from the call later in your application, not immediately. For example, you could use multiple Async Let calls to load gallery images without blocking the main thread, thereby allowing the user to continue using the application’s GUI while the images load. 

Use Async Let when:

  • You have enough detail to request the information you need prior to making the call 
  • The calls do not depend on another call’s results 
  • You are returning different kinds of data
  • The order in which the app returns results is unimportant

Task Groups

Task Groups allow you to combine an unknown number of parallel Child Task calls that return the same Type of data into a batch, and then wait until the last Child Task finishes before completing the call. This is most useful when the results are a consistent type, such as when combining API responses into a single object. Task Groups only complete after all Child Tasks in the Task Group are complete.

It is important to never mutate the Task Group using code from outside the Task where the Task Group was created. Doing so interleaves data obtained by the Task Group with the data from outside the Task Group which leaves the results inconsistent. 

Using Try Await allows you to handle any potential thrown errors in the grouped call using additional code.

For example, let’s say you have a function that returns a string value and you need to call the function n times. Each time that function returns, you want to append the resultant string to an array of strings:  

Once all the Tasks in the Task Group are complete, you want the Task Group to return a String array. The “of” type for the Task Group is String because the result of the parallel task is a String and the returning type is an array of Strings

Coding UIImages in Task Groups will appear more familiar. For example, let’s say that you have a list of indeterminate size composed of URLs that point to specific images, and a function that downloads an image from each of those URLs and then adds it to an image array returned from the Task Group.

In this case, the “of” type for your Task Group is UIImage, and because the parallel function inside the task is downloading UIImage data, and the returning type for the Task Group is an array of UIImages.

Task Group Example

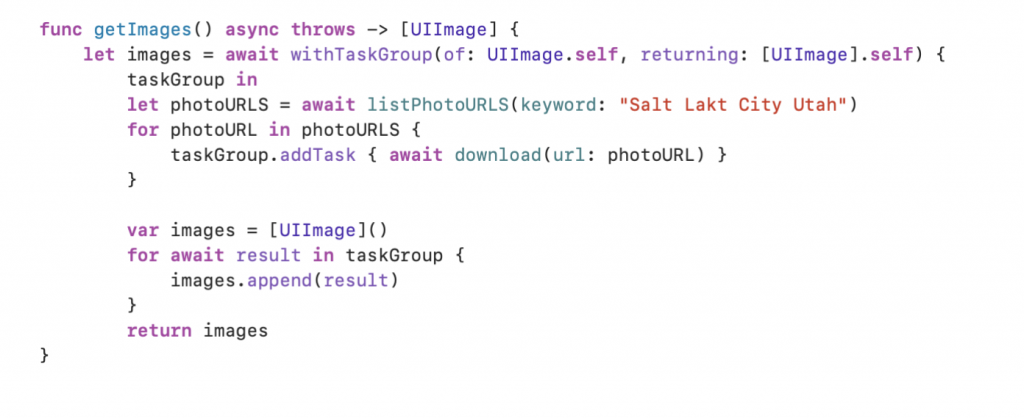
The Of type for this example Task Group scenario is UIImage and because the parallel function inside the task is downloading UIImage data, the “returning” type of the task group is an array of UIImages.

There are two things happening in this example code. The first is the execution of the parallel downloading task for the individual images located at each URL. The second takes the results from the previous task (the UIIMage) and combines them into a single array of images.

Resources

  • Apple Developer: Getting Started with Swift Concurrency
  • InRhythm Swift Lightning Talk (Deck): Structured Concurrency in Swift
  • Linkedin Video: InRhythm Propel Workshop (Video) 
  • GitHub Repo: Async Await Propel Workshop GitHub Repo 
  • Blog, Antoine van der Lee: Async await in Swift explained with code examples

Written by Mike Adams · Categorized: Code Lounge, InRhythmU, Learning and Development, Product Development, Software Engineering · Tagged: Async Await, best practices, INRHYTHMU, ios, iOS Workshop, learning and growth, Mobile App Development, Mobile Development, Mobile Engineering, Propel Spring Quarterly Summit 2023, software engineering, SwiftUI, ux

Apr 04 2023

Playwright’s Reporting And Parallelization Features

Based on a Lightning Talk by: Oleksii Lavrenin, Lead SDET @ InRhythm on March 17th, 2023 as part of the Propel Spring Quarterly Summit 2023

Author: Ted Parton, Lead Software Engineer @ InRhythm

Overview

No alt text provided for this image
Design Credit: Joel Colletti, Lead UI/UX Designer @ InRhythm

We recently held our Spring Summit consisting of six workshops hosted by each of our practice areas. On March 17th, 2023, our SDET Practice led a series of talks and workshops on Microsoft’s Playwright. Playwright is a tool that enables end-to-end testing of modern web applications. Playwright works with all modern web browsers including: Chromium, Firefox, and WebKit. For more information see: https://playwright.dev/

Playwright Parallelism

No alt text provided for this image

Playwright achieves parallelism by running multiple simultaneous processes threads. Each thread runs one Playwright Test File at a time. That is to say, if we have 10 test files and 5 threads, then the Playwright orchestrator will send a test file to each thread (or process), thus running five test files in parallel. As a thread becomes available, it will be provided as part of the next test file.

Tests in a test file are run in order by default. However, it is possible to parallelize those as well; keep in mind that tests run in parallel are in independent processes and cannot communicate with each other. So if one test is dependent on another, you would not want to run them in parallel.

Disabling Parallelism

No alt text provided for this image

You may on occasion have a good reason to disable parallel testing. For instance you may be targeting hardware that has limited process threads, memory, or CPU. Alternatively, there may be a particular workflow you need to follow and it would be best to run in a particular sequence.

Fortunately, Playwright does allow you to disable parallelism by setting the number of workers to one in the `test.describe.configure` settings. You can also do this from the command line runner with `npx playwright test –workers=1`

No alt text provided for this image

Control Test Order

No alt text provided for this image

By default the tests in a Playwright Test File are run in order of declaration. However, you can override that in some circumstances. For instance if you have disabled parallelism, test files will be run in alphabetical order by default. So you could control the order by coming with a good naming convention.

You can go a step further by controlling the order in helper functions. For more information on that, we recommend that you see the documentation located at: https://playwright.dev/docs/test-parallel#use-a-test-list-file

Playwright Reporting

No alt text provided for this image

Playwright Test includes the ability to create reports based on test results. Playwright includes seven predefined reporters and provides support for creating custom reporters.

The Predefined Reporters Are:

  • List Reporter

Prints a line for each test being run, and is the default for all executions except when running with CI. For CI the Dot reporter is the default.

Example Output:

No alt text provided for this image
  • Line Reporter

According to the official documentation, a Line Reporter is more concise than the List Reporter. It uses a single line to report the last finished test, and prints failures when they occur.

Line Reporter is useful for large test suites where it shows the progress but does not spam the output by listing all the tests.

Example Output:

No alt text provided for this image
  • Dot Reporter

The Dot Reporter provides a concise report by just producing a single character per successful test. The Dot Reporter is the default reporting method for CI. This method can be very useful anytime you do not want a lot of output.

Example Output:

No alt text provided for this image
  • HTML Reporter

As its name suggests, the HTML reporter generates an HTML based report. The HTML Reporter according to the documentation, by default, HTML reports are opened automatically if some of the tests failed. You can control this behavior via the open property in the Playwright config. The possible values for that property are always, never and on-failure (default).

You can also configure host and port that are used to serve the HTML Report.

  • JSON Reporter

This reporter generates results in JSON (JavaScript Object Notation). You may find it useful to have this written to a file rather than the screen. 

Below is an example of how to do this from Bash:

No alt text provided for this image

Alternatively you can define this behavior in the configuration file:

No alt text provided for this image
  • JUnit Reporter

This will produce a report in JUnit-style xml. As with the JSON Reporter, you will likely want to write this out to a file. The JUnit Reporter offers support for a robust set of options. If you are testing an app written in Java that utilizes JUnit for tests, this reporter can be highly useful. 

More information about this can be found at: https://playwright.dev/docs/test-reporters#junit-reporter

  • GitHub Reporter

Provides automatic failure annotations when running in GitHub actions. The other reporters work with GitHub Actions, but do not provide annotations.

Invoke A Reporter

No alt text provided for this image

It is quite easy to specify which reporter to use, by setting the name like in the example below:

No alt text provided for this image

Custom Reporters

No alt text provided for this image

As previously mentioned, you can create a custom reporter. Playwright provides an API to help with this at https://playwright.dev/docs/api/class-reporter. 

Below is an example of a custom TypeScript reporter courtesy of the Playwright website:

No alt text provided for this image

As with the pre-defined reporters, you can use your custom ones by specifying the name of the reporter. For instance, the custom reporter above can be accessed as:

No alt text provided for this image

Written by Kaela Coppinger · Categorized: DevOps, Software Engineering, Web Engineering · Tagged: best practices, devops, INRHYTHMU, JavaScript, learning and growth, Microsoft, parallelization, Playwright, Propel Spring Quarterly Summit 2023, Propel Workshop, reporting, software engineering, testing

Mar 30 2023

A Comprehensive Guide To Playwright’s Debugging And Tracing Features

Based on a Lightning Talk by: Alex Kurochka, Senior SDET Engineer @ InRhythm on March 17th, 2023 as part of the Propel Spring Quarterly Summit 2023

Author: Ted Parton, Lead Software Engineer @ InRhythm

Overview

No alt text provided for this image
Design Credit: Joel Colletti, Lead UI/UX Designer @ InRhythm

We recently held our Spring Summit consisting of six workshops hosted by each of our practice areas. On March 17th, 2023, our SDET Practice led a series of talks and workshops on Microsoft’s Playwright.

Playwright is a tool that enables end-to-end testing of modern web applications. Playwright works with all modern web browsers including: Chromium, Firefox, and WebKit.

In this article, we will go over three tools to go over debugging with Playwright:

  • Playwright Inspector
  • Playwright Test For VSCode
  • Trace Viewer

Fixtures

No alt text provided for this image

Before we get into specific tools, let’s talk about Playwright Fixtures.

For those unfamiliar with test fixtures, these can be useful in establishing an environment for each test. That is, a fixture can provide everything a test needs to run. It is recommended that your fixtures provide only the absolutely necessary things to run and nothing else. In Playwright, fixtures are isolated between tests. With fixtures, you can group tests based on their meaning, instead of their common setup.

According to the official Playwright documentation (source: https://playwright.dev/docs/test-fixtures), Fixtures have a number of advantages over before/after hooks:

  • Fixtures encapsulate setup and teardown in the same place so it is easier to write
  • Fixtures are reusable between test files – you can define them once and use them in all your tests. That’s how Playwright’s built-in page fixture works
  • Fixtures are on-demand – you can define as many fixtures as you’d like, and Playwright Test will setup only the ones needed by your test and nothing else
  • Fixtures are composable – they can depend on each other to provide complex behaviors
  • Fixtures are flexible. Tests can use any combination of the fixtures to tailor the precise environment they need, without affecting other tests
  • Fixtures simplify grouping. You no longer need to wrap tests in describes that set up environment, and are free to group your tests by their meaning instead
No alt text provided for this image

Playwright Inspector

No alt text provided for this image

Playwright Inspector is the default debugging tool for Playwright. While Playwright scripts typically run in a headless mode, Playwright Inspector has a GUI to help troubleshoot your script which opens during the test run along with the browser that opens in headed mode.

To enable it we add a `–debug` to our command line. You can specify which test to run by adding `-g “test name”`. See our example below:

No alt text provided for this image

 When you run tests in debug mode, VSCode will open up the Playwright Inspector window, which will show the code to be executed and the debugger, such as the image below:

No alt text provided for this image

Once we have started our application with Playwright debugging on, we can step through the code in the Playwright Inspector and choose when to use our Fixtures for our tests. You can also let the tests play, and if it will stop at any part that breaks. From there you can look at the error report generated by Playwright. The error report can include lots of useful information such as timeouts, missing variables, unexpected results, etc. In addition to the report you can also view the results in the terminal from VSCode. 

See below for an example:

No alt text provided for this image

With Playwright Inspector you can set breakpoints to help you debug., You may find it helpful to add a breakpoint on a line before the line you know is broken. Breakpoints should be set in code with the await page.pause() statement. This will give you the ability to look at current variables and settings before you get to the line you are attempting to diagnose. But where Inspector truly shines is helping you debug the web page document object model (DOM).

The browser console can be used to debug locators while running tests in debug with playwright inspector. A javascript ‘playwright’ object can be used to evaluate different locators while the test run stopped at a breakpoint. To test locators use ‘playwright’ object methods like: playwright.locator(“string-locator”) and playwright.inspect(“string-locator”).

Playwright Test For VSCode

No alt text provided for this image

Playwright Test for VSCode is a plugin that helps you integrate Playwright into your VSCode workflow. According to Microsoft, this plugin can:

  • Install Playwright
  • Run Tests With A Single Click
  • Run Multiple Tests
  • Show Browsers
  • Pick Locators
  • Debug Step-By-Step, Explore Locators
  • Tune Locators
  • Record New Tests
  • Record At Cursor

You can install this extension by clicking on the extension tab/button in VSCode, then search for “playwright.” Click on the one that says “Playwright Test for VSCode” by Microsoft.

No alt text provided for this image

Once installed it will scan your project for all of your tests and group them together. With this integrated into VSCode, a play button will now appear beside tests in your test files. This makes it much easier to start and debug than with Playwright Inspector where you need to use a command line.

Additionally this adds a Playwright panel to VSCode that makes it easier to toggle options such as should your test run in headless mode or not. In short, this plug-in adds in a lot of nice features designed to provide a better user experience for testers.

Trace Viewer

No alt text provided for this image

Finally we have a Trace Viewer. Playwright Trace Viewer is a GUI tool that helps you explore recorded Playwright traces after the script has run. You can open traces locally or in your browser on trace.playwright.dev.

There are a couple of ways to enable the trace viewer. First the command line, where you add the option, `–trace on` or you can go to the Playwright settings file and enable (or disable) it there. 

Results are stored in a trace folder. To open a trace via the command line you enter, `playwright show-trace <path-to-file>` and hit ENTER. The trace viewer provides you with a lot of detailed information such as page load times, calls to resources, and which Javascript functions are being called.

Closing Thoughts

No alt text provided for this image

In conclusion, though each of these tools has its pluses and minuses, utilizing a combination of all three can help you take your diagnostics to a whole new level.

Written by Kaela Coppinger · Categorized: DevOps, Software Engineering, Web Engineering · Tagged: best practices, debugging, devops, INRHYTHMU, learning and growth, Microsoft, Playwright, Propel, Propel Spring Quarterly Summit 2023, Propel Workshop, software engineering, Tracing

Footer

Interested in learning more?
Connect with Us
InRhythm

195 Broadway
Suite 2400, Floor 24
New York, NY 10007

1 800 683 7813
get@inrhythm.com

Copyright © 2023 · InRhythm on Genesis Framework · WordPress · Log in

This website uses cookies to improve your experience. We'll assume you're ok with this, but you can opt-out if you wish. Cookie settingsACCEPT
Privacy & Cookies Policy

Privacy Overview

This website uses cookies to improve your experience while you navigate through the website. Out of these cookies, the cookies that are categorized as necessary are stored on your browser as they are essential for the working of basic functionalities of the website. We also use third-party cookies that help us analyze and understand how you use this website. These cookies will be stored in your browser only with your consent. You also have the option to opt-out of these cookies. But opting out of some of these cookies may have an effect on your browsing experience.
Necessary
Always Enabled
Necessary cookies are absolutely essential for the website to function properly. This category only includes cookies that ensures basic functionalities and security features of the website. These cookies do not store any personal information.
Non-necessary
Any cookies that may not be particularly necessary for the website to function and is used specifically to collect user personal data via analytics, ads, other embedded contents are termed as non-necessary cookies. It is mandatory to procure user consent prior to running these cookies on your website.
SAVE & ACCEPT